Getting Started building Cordova Apps for IoTize Taps
Apache Cordova is a cross-platform mobile development framework that allows you to build apps for Android, iOS, and other platforms, using HTML5 and JavaScript.
You implement the interface in HTML5 and JavaScript, then use the Cordova framework to build the app for your given platform. Cordova also integrates a system of plug-ins so you could extend the basic browser application using native features of the various platforms.
Ionic Framework is a set of css classes and a library of JavaScript directives and modules, built on top of Cordova, using AngularJS.
IoTize provides a BLE Cordova plug-in to communicate with Tap devices, and libraries of JavaScript IoTize APIs that help you build Tap monitoring apps for Android, iOS and Windows.
Get the Tools
Cross-platform development with Ionic framework interacts with several SDKs for mobile app development, and each relies upon a specific set of tools. You should ensure that your system meets all your targeted platform's requirements:
-
To test and debug Android apps, you need Android SDK: Android Requirements.
-
To test and debug iOS apps, you need a Mac computer with Xcode9: iOS Requirements.
-
To test and debug Windows 10 apps, you need Visual Studio 2017 with Universal Windows Platform development tools: Windows 10 Requirements.
-
To use Cordova and Ionic command line utilities, you need Node and npm: Install NodeJS.
-
Install Ionic CLI and Cordova: Install Ionic. Please note that at the the time of writing this documentation, Ionic4 is not compatible with Windows10 development, so we recommend you install Ionic3.
Create an Ionic Project
In your development folder, use the ionic start command to create a project:
$ ionic start myFirstApp tabs
This command creates a directory called myFirstApp in your working directory. It creates your project, installs node modules for the application, and prompts you to setup Cordova.
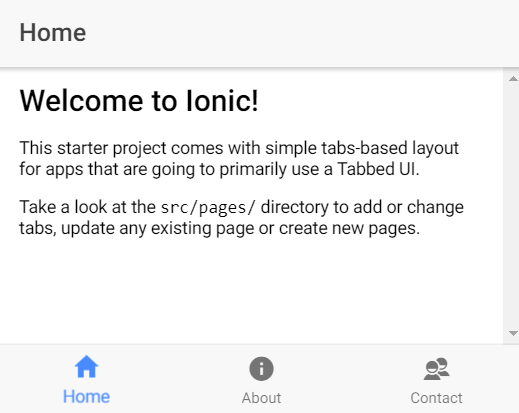
Now, you can cd into the folder that was created. To get a quick preview of your app in the browser, use the serve command.
$ cd myFirstApp/
$ ionic serve

Refer to Ionic documentation to learn more about project architecture and Ionic template files.
Install IoTize plug-ins and library modules
IoTize BLE Cordova plug-in enables wireless communication between smartphones and Taps using BLE communication. To add the plug-in to your project, run the following command:
$ ionic cordova plugin add @iotize/cordova-plugin-iotize-ble
IoTize JavaScript library facilitates the development of mobile applications, so it should be integrated in your Ionic project by running the following command:
$ npm install @iotize/device-client.js --save
IoTize libraries need RxJS version 6, so you need to update RxJS and install the rxjs-compat dependency:
$ npm i rxjs@^6 --save
$ npm i rxjs-compat --save
Run on different platforms
The Cordova Command Line Interface (CLI) does most of the heavy lifting, building and running a Cordova app. But the workload differs depending on the targeted platform.
Android
The CLI supports both building and running Android apps on Windows. You may need to install a USB driver for your Android device (see Android’s installing USB Drivers page). To compile and install it on your device, connect the device over USB and run the following command:
$ ionic cordova run Android
Refer to Cordova Documentation to learn more about Android development with Cordova.
iOS
iOS development needs a MAC computer and XCode version 9 or newer. The following command generates the XCode project in the "platforms\ios" subdirectory of your project:
$ ionic cordova add platform iOS
Refer to Cordova documentation to learn more about iOS development with Cordova. There are several pre-requirements to deploy a device.
Windows 10
When building for Windows 10, Cordova generates a Windows UWP app. The app is launched in Visual Studio, in the same way as a native Windows 10 project. For more information, see Run Your Apache Cordova App on Windows.
The following command generates a Visual Studio 2017 solution in platforms\windows subdirectory of your project:
$ ionic cordova add platform windows
Set the debug settings of this generated project in order to directly build and install the app from Visual Studio 2017. Please note that at the time of writing this documentation, Ionic 4 is not compatible with Windows 10, so if you want to target this platform you should install and use Ionic 3.
Scan BLE Taps
Now that you’ve got all the assets in place, it’s time to make the application itself. IoTize BLE Cordova plug-in could be used to scan and connect to BLE Tap devices.
BLE scan provider
We will use an Angular 4 provider to handle the BLE scanning feature for our application.
$ ionic g provider ble-scanner
This adds and generates ble-scanner.ts file into your project. Edit and modify this file with the following code:
import { Injectable, EventEmitter  } from '@angular/core';
import { BLEScanner, DiscoveredDeviceType } from "@iotize/cordova-plugin-iotize-ble";
/*
  BleScannerProvider handles BLE scanning sessions.
*/
@Injectable()
export class BleScannerProvider {

  //BLE Scan handler from cordova-plugin-iotize-ble
  public bleScanner: BLEScanner;

  //List of discovered Tap devices
  public devices: DiscoveredDeviceType[];

  //Angular event emitter that notifies the app each time a new device has been discovered during scan
  public updateDisplay: EventEmitter<void>;

  constructor() {
    this.bleScanner = new BLEScanner();
    this.devices = [];
    this.updateDisplay = new EventEmitter();

    this.subscribeToDevices();
  }

  subscribeToDevices() {
    this.bleScanner.devicesObservable().subscribe({
    next: (device) => {
        this.devices.push(device); // Push the discovered device to the devices array
        this.updateDisplay.emit();   // Emit an event
        }
    });
  }

  startScan() {
    this.devices.splice(0);    // Refresh discovered devices array
    this.bleScanner.start({}); // Launch BLE scan
  }

  stopScan() {
    this.bleScanner.stop();
  }

}
We are going to use this provider to scan and display available Taps.
Scan the available BLE Taps
We will modify the home page of the app to add: - the scanning commands - two buttons to start and stop the scanning session. - a list to display the discovered devices.
Open pages/home/home.html and replace its content with the following:
<ion-header>
  <ion-navbar>
    <ion-title>IoTize Taps</ion-title>
  </ion-navbar>
</ion-header>

<ion-content padding>
  <button ion-button (click)="bleScanner.startScan()">Start scan</button>
  <button ion-button (click)="bleScanner.stopScan()">Stop scan</button>

  <ion-list>
    <ion-item *ngFor="let device of bleScanner.devices">
      <p>Name: {{device.name}}</p>
      <p>Id: {{device.address}}</p>
      <p *ngIf="device.rssi">RSSI: {{device.rssi}}</p>
    </ion-item>
  </ion-list>
</ion-content>
We use BLEScannerProvider to handle the scanning session, and display a list in the following manner (pages/home/home.ts) :
import { Component, ChangeDetectorRef } from '@angular/core';
import { NavController } from 'ionic-angular';
import { BleScannerProvider } from '../../providers/ble-scanner/ble-scanner';

@Component({
  selector: 'page-home',
  templateUrl: 'home.html'
})
export class HomePage {

  constructor(public navCtrl: NavController,
            public bleScanner: BleScannerProvider,
            public changeDetector: ChangeDetectorRef){
            }
}

ionViewWillLoad() {

    //subscribe to the events from ble scanner
    this.bleScanner.updateDisplay.subscribe(() => {

        //the list of devices has been changed
        //notify the change to rerender the page
        this.changeDetector.detectChanges();

    });
}
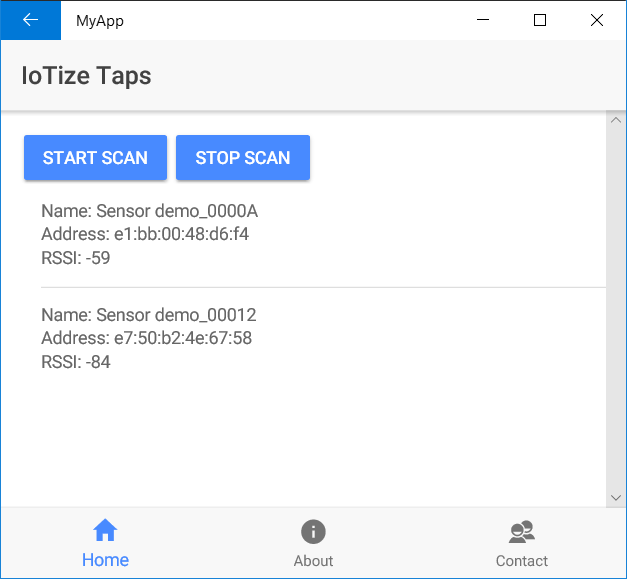
Build and run the app, you should have something like the following screen:

The format of BLE advertising data varies depending on your platform. On Android advertising, data will be the raw advertising bytes. iOS does not allow access to raw advertising data, so a dictionary of data is returned. iOS indentifies BLE devices using a UUID, whereas Android and Windows use the MAC address.
Android platforms return the following information:
{
    "name": "demo",
    "id": "00:1A:7D:DA:71:13",
    "rssi": -37
}
iOS platform returns the UUID of the device (not the MAC address):
{
    "name": "demo"
    "id": "15B4F1C5-C9C0-4441-BD9F-1A7ED8F7A365",
    "rssi": -61
}
Now that that we have the list of available Tap devices, we are ready to start a communication session. In the following section we use IoTize Tap APIs to connect and retrieve some information from a Tap.
Connect to a BLE Tap
IoTize provides device-client Javascript API to handle the heavy lifting of the communication with the device, and to give you access to the high level functionalities of Taps such as monitoring, authentication and encrypted communication.
We must add a new IoTizeDevice member to our BLEScannerProvider class to get access to the Taps' functionalities.
import { IoTizeDevice } from '@iotize/device-client.js/device';
....
this.tap = IoTizeDevice.create();
To connect with the Tap using BLE, IoTizeDevice needs cordova-plugin-iotize-ble.
import { BLEComProtocol } from '@iotize/cordova-plugin-iotize-ble';
....
await this.tap.connect(new BLEComProtocol(AddressOrUUID));
Once connected, we can use the exposed services of IoTizeDevice class. In this example we are going to read the serial number of the Tap.
let serialNumber =  await  this.tap.service.device.getSerialNumber();
...
selectedDevice.serialNumber = serialNumber.body();
Modify the three source files, ble-scanner.ts, home.ts and home.html, as follows:
providers/ble-scanner/ble-scanner.ts*
import { Injectable, EventEmitter  } from '@angular/core';
import { BLEScanner, DiscoveredDeviceType } from "@iotize/cordova-plugin-iotize-ble";
import { BLEComProtocol } from '@iotize/cordova-plugin-iotize-ble';
import { IoTizeDevice } from '@iotize/device-client.js/device';

//Tap object
class TapDevice implements DiscoveredDeviceType {

  public serialNumber: string ;

  constructor (public name: string, public address: string, public rssi?:string) {
    this.serialNumber = "";
  }
}

/*
* BLEScannerProvider handles BLE communication with Taps
*/
@Injectable()
export class BleScannerProvider {

  //BLE Scan handler from cordova-plugin-iotize-ble
  public bleScanner: BLEScanner;

  //List of discovered Tap devices
  public devices: TapDevice[];

  //Tap handler
  public tap: IoTizeDevice;

  //Angular event emitter that notifies the app each time a new device has been discovered during scan
  public updateDisplay: EventEmitter<void>;

  constructor() {

    this.bleScanner = new BLEScanner();
    this.devices = [];
    this.updateDisplay = new EventEmitter();
    this.tap = IoTizeDevice.create();

    this.subscribeToDevices();
  }

  //subscribe to discovery notification
  subscribeToDevices() {
    this.bleScanner.devicesObservable().subscribe({
    next: (device) => {

        let discoveredTap : TapDevice = new TapDevice(device.name, device.address,device.rssi );

        this.devices.push(discoveredTap); // Push the discovered device to the devices array
        this.updateDisplay.emit();   // Emits an event
        }
    });
  }

  startScan() {
    this.devices.splice(0);    // Refreshes discovered devices array
    this.bleScanner.start({}); // Launches BLE scan
  }

  stopScan() {
    this.bleScanner.stop();
  }

  //connect, read the Serial Number and disconnect from the Tap
  async readSerialNumber(addressOrUUID: string){

    let selectedDevice = this.devices.find(x => x.address == addressOrUUID);

    //Connect
    try{
      await this.tap.connect(new BLEComProtocol(addressOrUUID));
      }catch(error){
        selectedDevice.serialNumber = "connection error :"+ error;
        return;
    }

    //read serial number
    let serialNumber =  await  this.tap.service.device.getSerialNumber();
    selectedDevice.serialNumber = serialNumber.body();

    //disconnect
    await this.tap.disconnect();

    //send a notification
    this.updateDisplay.emit();   // Emits an event to update display
  }
}
pages/home/home.html
<ion-header>
  <ion-navbar>
    <ion-title>IoTize Taps</ion-title>
  </ion-navbar>
</ion-header>

<ion-content padding>
  <button ion-button (click)="bleScanner.startScan()">Start scan</button>
  <button ion-button (click)="bleScanner.stopScan()">Stop scan</button>
  <ion-list>
    <ion-item *ngFor="let device of bleScanner.devices" >
      <p>Name: {{device.name}}</p>
      <p>Address: {{device.address}}</p>
      <p *ngIf="device.rssi">RSSI: {{device.rssi}}</p>
      <button (click)="bleScanner.readSerialNumber(device.address)">Serial Number: {{(device.serialNumber == '') ? 'click to read' : device.serialNumber}}</button>
    </ion-item>
  </ion-list>
</ion-content>
pages/home/home.ts
import { Component, ChangeDetectorRef } from '@angular/core';
import { NavController } from 'ionic-angular';
import { BleScannerProvider } from '../../providers/ble-scanner/ble-scanner';

@Component({
  selector: 'page-home',
  templateUrl: 'home.html'
})
export class HomePage {

  constructor(public navCtrl: NavController,
            public bleScanner: BleScannerProvider,
            public changeDetector: ChangeDetectorRef){
            }


  ionViewWillLoad() {

    //subscribe to the events from ble scanner
    this.bleScanner.updateDisplay.subscribe(() => {

        //the list of devices has been changed
        //notify the change to rerender the page
        this.changeDetector.detectChanges();
    });
  }

  //read Serial Number of the Tap device
  async readSerialNumber(AddressOrUUID: string){

    await this.bleScanner.readSerialNumber(AddressOrUUID);

  }

}
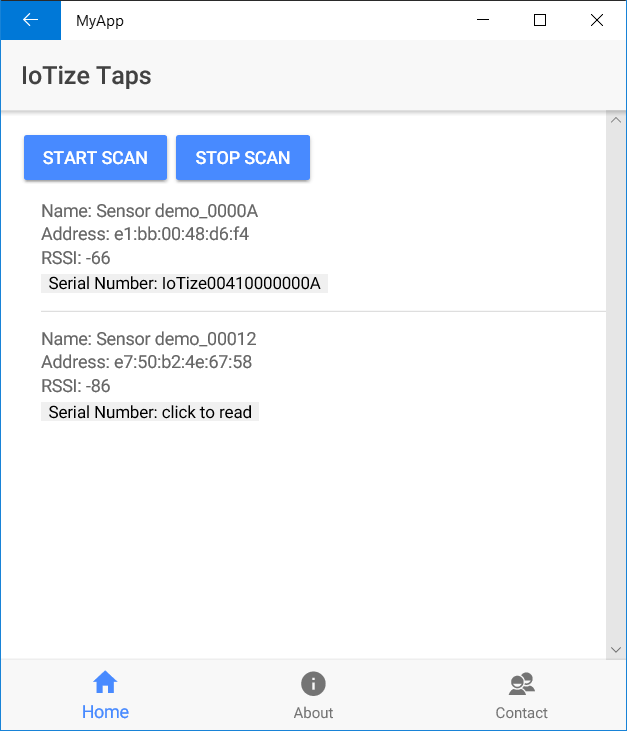
Build and run the App, then connect to your Tap to read its Serial Number:

This concludes the Cordova Getting Started tutorial. You are now ready to learn more about IoTize Device APIs from the documentation.
You can also try the sample projects from Github: TapNLink : iotize-monitoring.ionic TapNPass : iotize-terminal.ionic