Tap Manager Applications
What is it ?
Tap Manager is an application available on the app stores used as a viewer for your HTML/Javascript based application.
It means that you don't need to publish yourself an app on the playstore. Low level communication with the Tap Device is handled for you.
This solution is made for you if
- You need a Proof Of Concept for your app
- You don't have mobile app coding skills
- You don't need advanced mobile features such a GPS.
How does it work ?
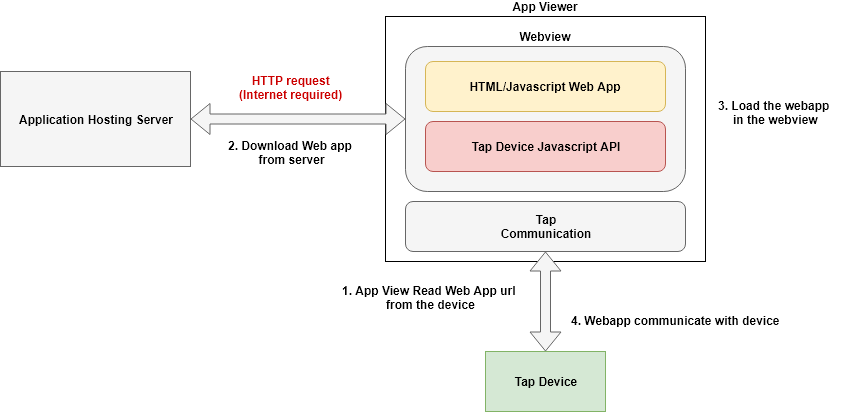
Tap Manager runs your webapp inside a WebView. When you connect to a device through the app it will:
- Read the url configured on the tap device.
- Download your application (an internet connection is required)
- Inject the device in your web app
- Run your application in the webview
Create your app
To create your web app you have 3 choices:
- Use a dynamically created app.
- Use the app generator.
- Create an application from scratch.
1. Dynamically created app
No documented yet
2. Using the App Generator
No documented yet
3. Developing from scratch
You need at least 2 libraries:
@iotize/device-client.jsthe core library@iotize/device-com-webview.jsfor communication between the webview and your application.
Development is similar to developing for the browser except that your app will run inside a webview instead of a navigator.
Minimalist example
Here a minimal application that reads the application name configured on the Tap Device.
<html>
<head>
    <!-- ...  -->
    <!-- IoTizeDeviceClient library -->
    <script type="text/javascript"
        src="https://cdn.jsdelivr.net/npm/@iotize/device-client.js@latest/dist/iotize-device-client.min.js">
    </script>
    <!-- IoTizeDeviceComWebview library -->
    <script type="text/javascript"
        src="https://cdn.jsdelivr.net/npm/@iotize/device-com-webview.js@latest/dist/iotize-device-com-webview.min.js">
    </script>
</head>
<body>
    <script>
    window.onload = function(){
        // Check that we are running inside an IoTize webview
        if (!IoTizeDeviceComWebview.isIoTizeWebView()){
            console.error(`Application is not running inside a valid webview.`);
            return;
        }

        // Get device object injected by the WebView
        let tap = IoTizeDeviceComWebview.getInjectedIoTizeDevice();

        // We can now do what we want with the device instance (refer to the Guide...)
        // Connect first
        tap.connect()
            .then(function onConected(){
                // We are now connected!
                // For example we can read the configured application name from the device
                tap.service
                    .device
                    .getAppName()
                    .then(function (response) {
                        let appName = response.body();
                        console.info(`App name is ${appName}`);
                    })
                    .catch(function onError(err){
                        console.error(`Cannot read application name due to error`, err);
                    });
            })
            .catch(function onConnectError(err){
                console.error(`Cannot connect to device due to error`, err);
            });

    }
    </script>
</body>
</html>
Tips See Tap Device documentation about Sending requests if don't understand this example.
More advanced web app
You can also develop your web app using your favorite javascript framework such as angular or view.js.
Typescript definition files are provided with the libraries.
See API Guide and Api references.
Publishing your app
Tap Manager must be able to download your app from the internet.
To do so, your app should be hosted on an http server of your choice.
You must also configure your Tap Device to point to the URL of your web application using IoTize Studio
and edit option application path.
By default and for testing purposes, you can use IoTize http server at url http://user.cloud.iotize.com/users/.